You do not need to read this manual before you start. Do these five things in your first ten minutes; the chapters are for the moment a screen surprises you.
1Start the trial. Open the console and tap "Start 30-day free trial — 30 students, no card". 30 days, up to 30 students, no card. Nothing is charged, and nothing rolls over on its own.
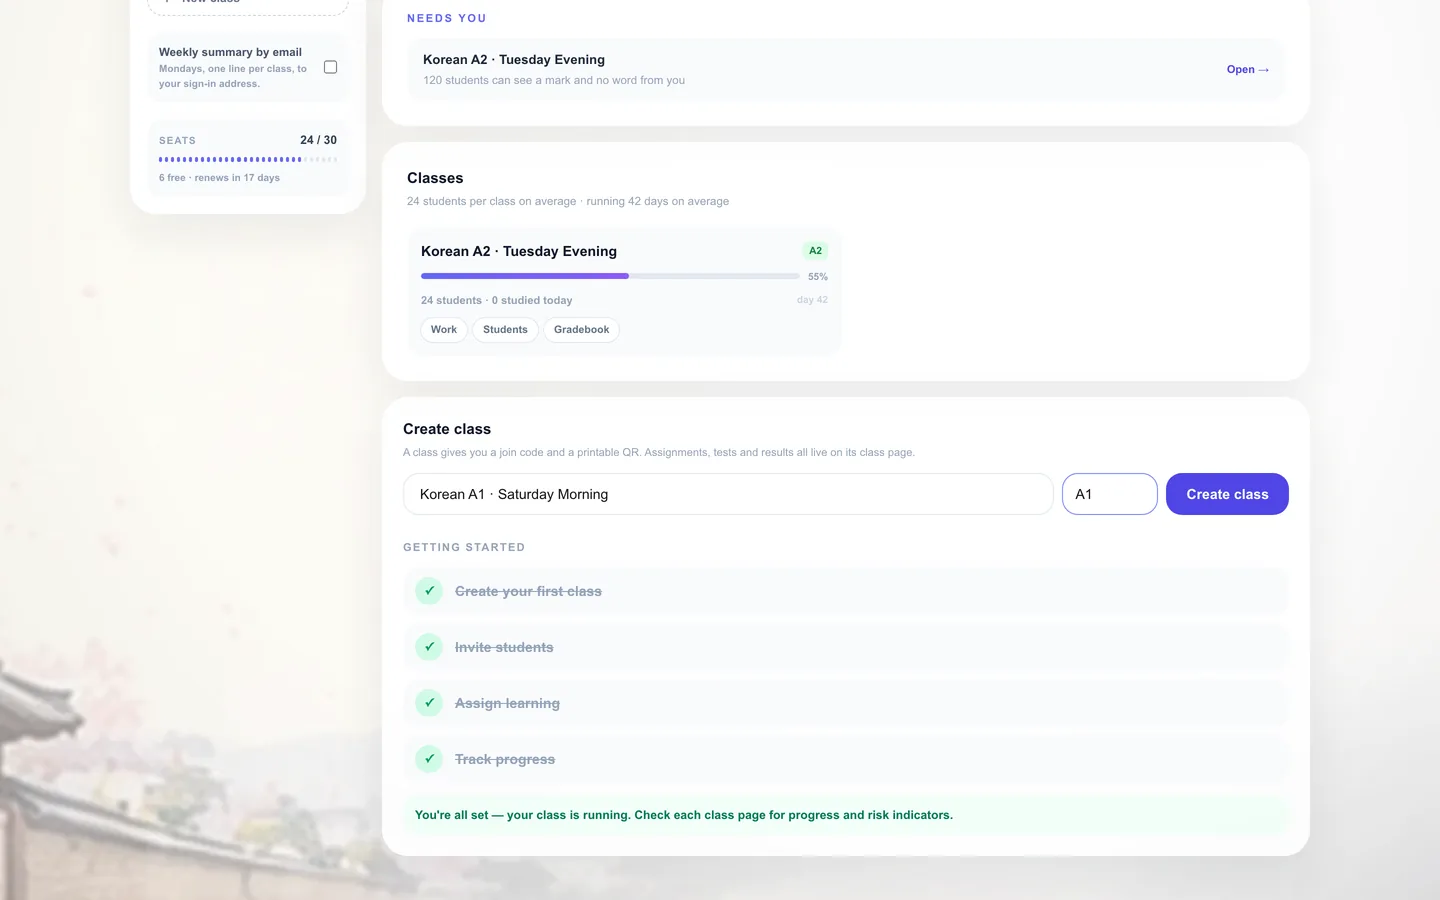
2Create a class. Type a name and a level in "Create class". The class is issued a join code and a QR sheet the moment it exists.
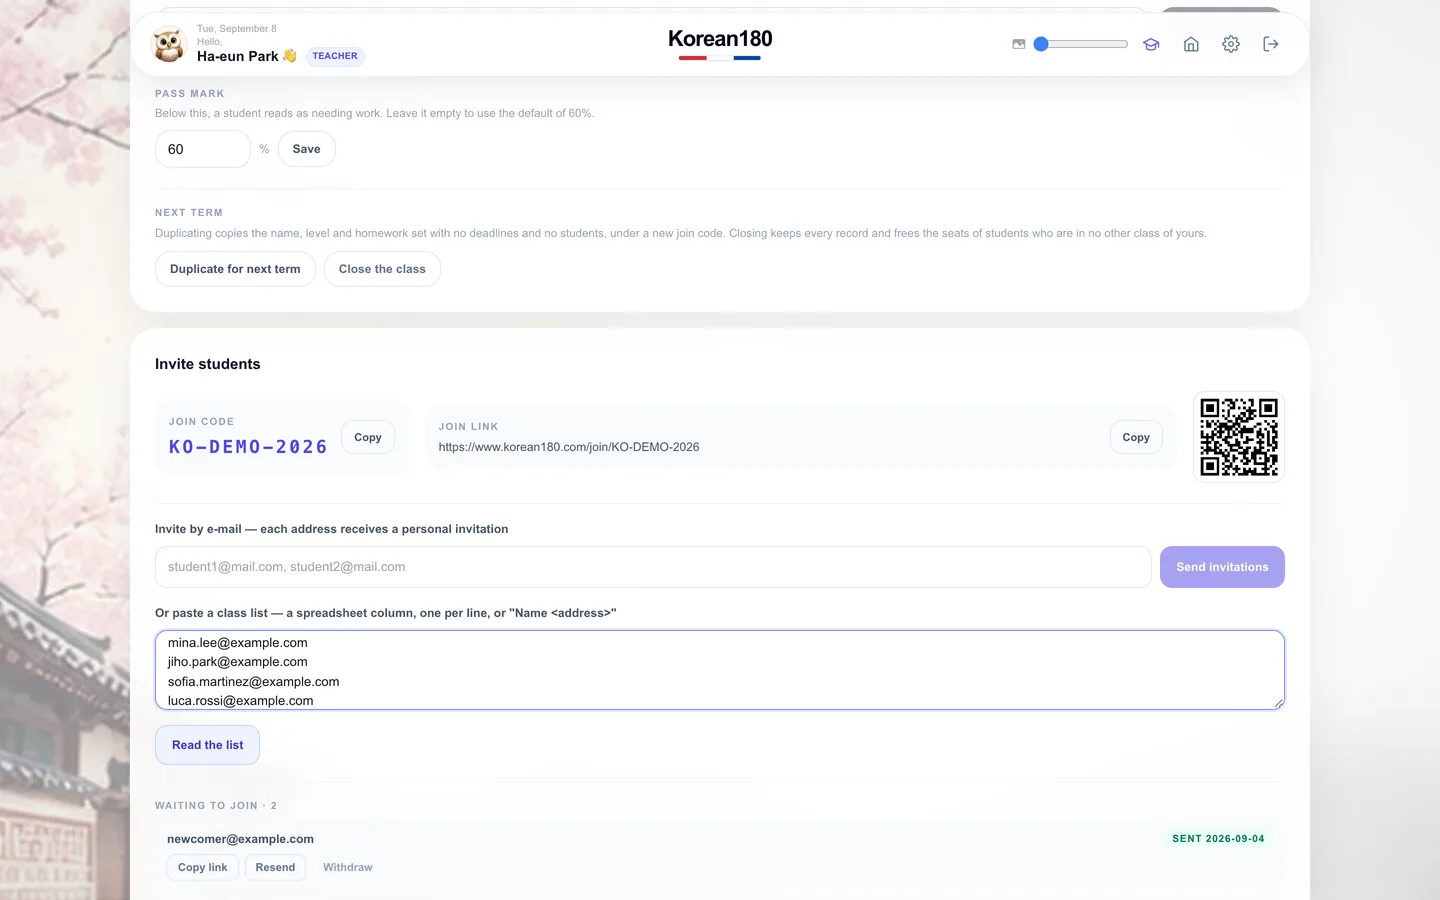
3Invite students. Open the class, tap "Invite students", paste addresses or a roster. Each student receives a personal link and joins on one of your seats.
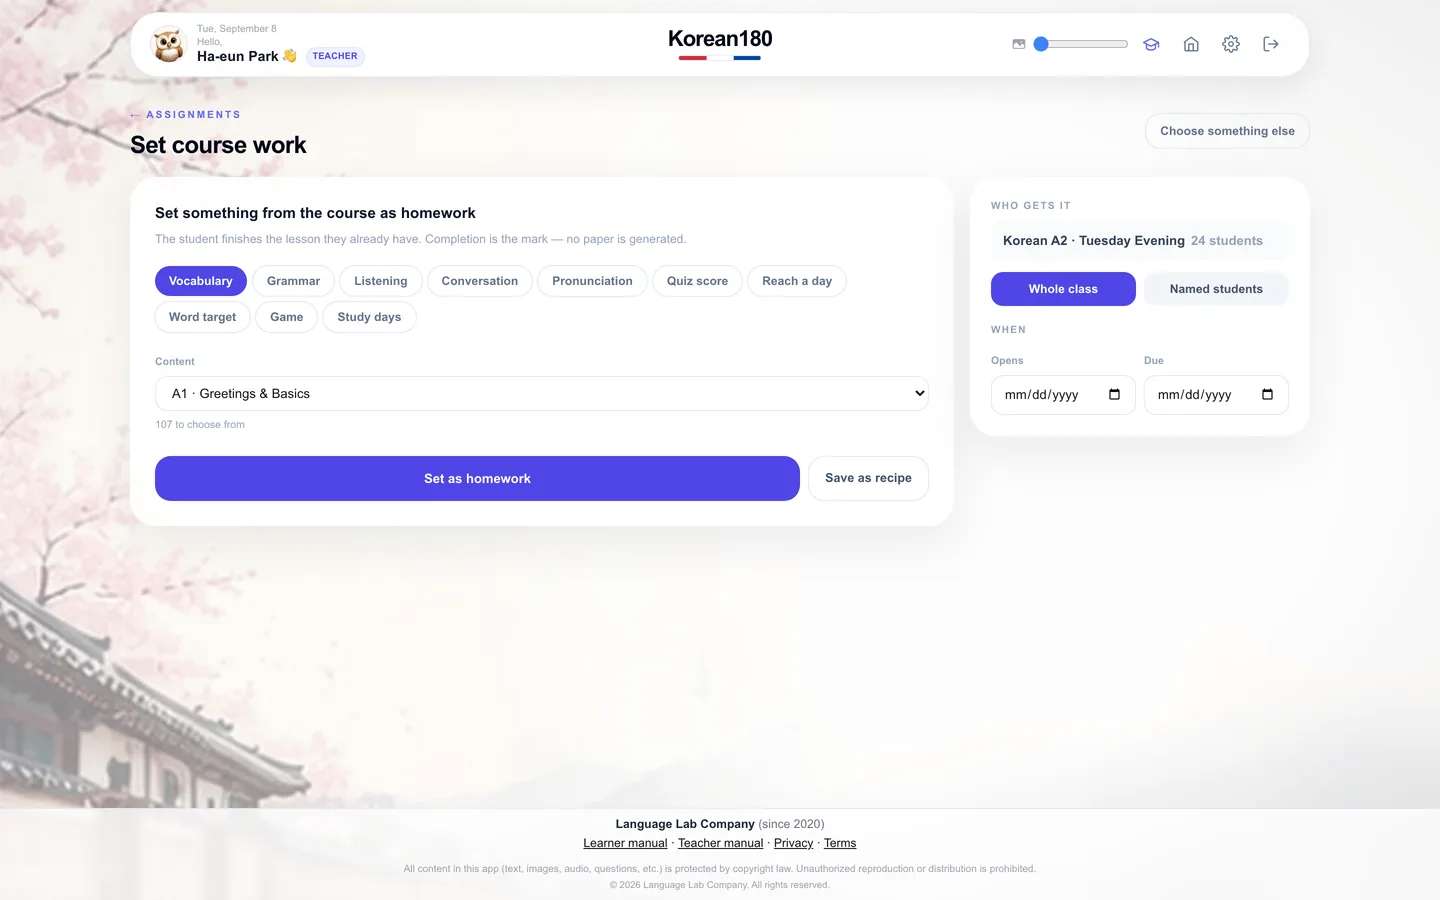
4Set one piece of homework. Open "Work", pick a word set or a grammar topic, set a due date. Results arrive as each student finishes.
5Turn on the weekly summary. The switch is in the left rail of the console. Every Monday, one line per class, to your sign-in address.
That is a class running. Everything else on the console is a way of looking at what those students do next.
Chapter 01
The console
Read the state of every class you teach in one screen and go where you are needed.
1234
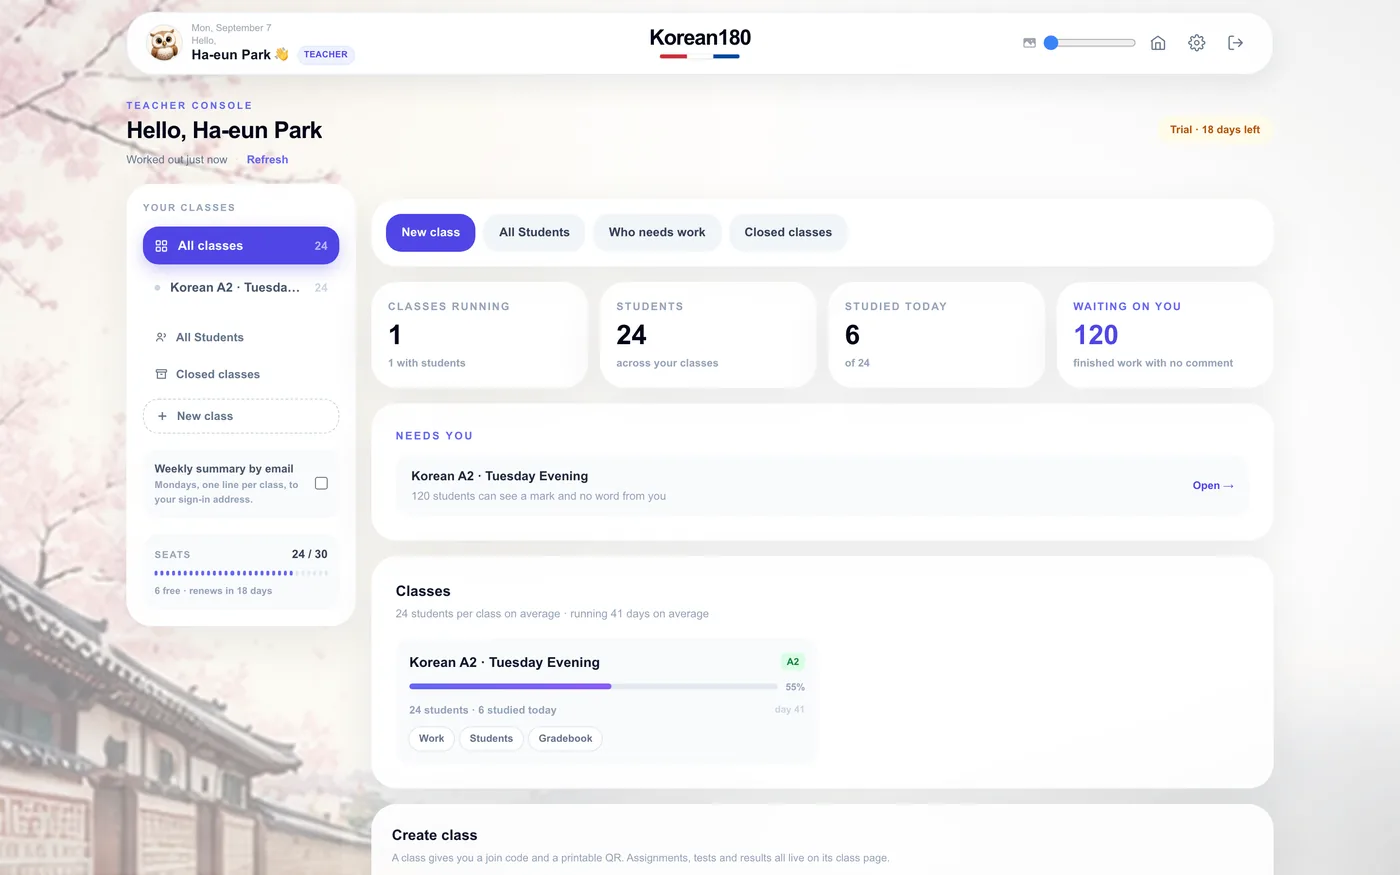
1Open the teacher console from the header. The console shows all classes; a class page shows one.
2Read the four counters: classes running, students, studied today, waiting on you.
3Open "Needs you". It lists the students who have a mark and no word from you yet.
4Use the left rail to switch class, open all students, or create a class.
What you will seeCounters for the whole account, the "Needs you" list, one card per class with its day and its activity.
TipTap "Refresh" under your name after a lesson; the counters update on load, not live.
Common mistakeReading "Studied today: 0" at eight in the morning as a problem; the counter resets at midnight in your time zone.
Chapter 02
Create your first class
Make a class that students can join in one minute, with a code and a QR sheet.
123
1Scroll to "Create class" at the foot of the console.
2Type a name students will recognize and the level the class works at.
3Tap "Create class". The class page opens with its join code and "Print QR sheet".
4Project or print the sheet, or send the code; a student who enters it joins the class on one of your seats.
What you will seeThe new class in the left rail and in "Classes", with zero students and a join code that never expires while the class is open.
TipOne class per group you actually teach. Levels, homework, and the gradebook are all per class.
Common mistakePutting two groups in one class to save seats mixes their homework and makes the gradebook unreadable; seats are per student, not per class.
Chapter 03
Invite students
Bring a whole roster in at once, each student on a personal link.
1234
1Open the class, then "Students". "Invite students" holds the join code, the link, and the QR sheet.
2Type addresses in "Invite by e-mail", or paste a class list below it and tap "Read the list".
3Tap "Send invitations". Each student receives a mail from invitation@lingo180.com with a link that is theirs alone.
4Watch "Waiting to join". A row moves into the students table when the student signs up through the link.
What you will seeOne row per address with its status: invited, joined, or bounced; the seat counter in the rail falls as students join.
TipStudents who already have an account join with the same link; nothing is duplicated.
Common mistakeForwarding one student's link to another signs the second student into the first one's seat.
Chapter 04
Homework
Set work from the course so results reach you without marking.
1234
1Choose what to set: the tabs run from "Vocabulary" to "Reach a day".
2Pick the set or the topic from the list under the tabs.
3Choose who gets it — "Whole class" or "Named students".
4Set the dates under "When", then tap "Set as homework".
What you will seeThe assignment appears in the class's work list with a bar that fills as students finish.
TipLeave "Due" empty for practice that never closes; leave "Opens" empty to open it now.
Common mistakeAssigning next week's topic before this week's is done stacks two cards on every student's dashboard and lowers completion of both.
Chapter 05
Building a test
Compose a mixed-skill test from the course pool in two minutes.
1234
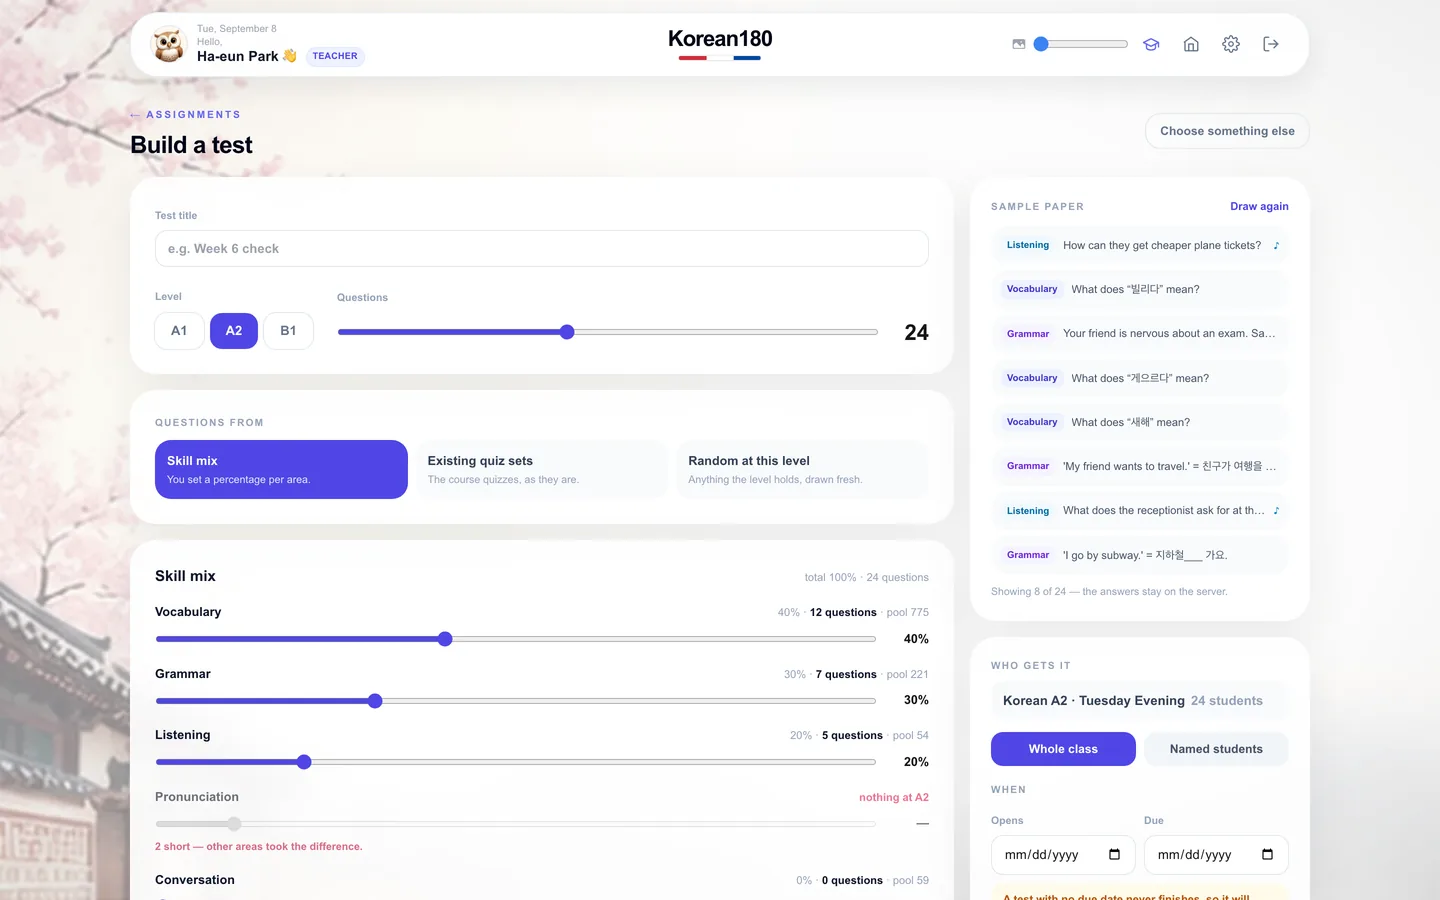
1Open "Work", choose "Build a test", and give it a title.
2Set the level and drag "Questions" to the count you want.
3Choose "Skill mix" and move each skill's slider; the total must reach 100%.
4Read "Sample paper" on the right, tap "Draw again" if you want other questions, choose who gets it, and set the dates.
What you will seeThe sample paper updates as you move sliders; the test appears in "Work" and is marked automatically.
TipA skill with too few questions at the level shows "nothing at A2" under its slider; raise the level or lower the count.
Common mistakeSetting one skill to 100% builds a quiz, not a test; the exam mixes skills, and so should the practice.
Chapter 06
Your own material
Add your own words and sentences so the course carries what you teach.
123
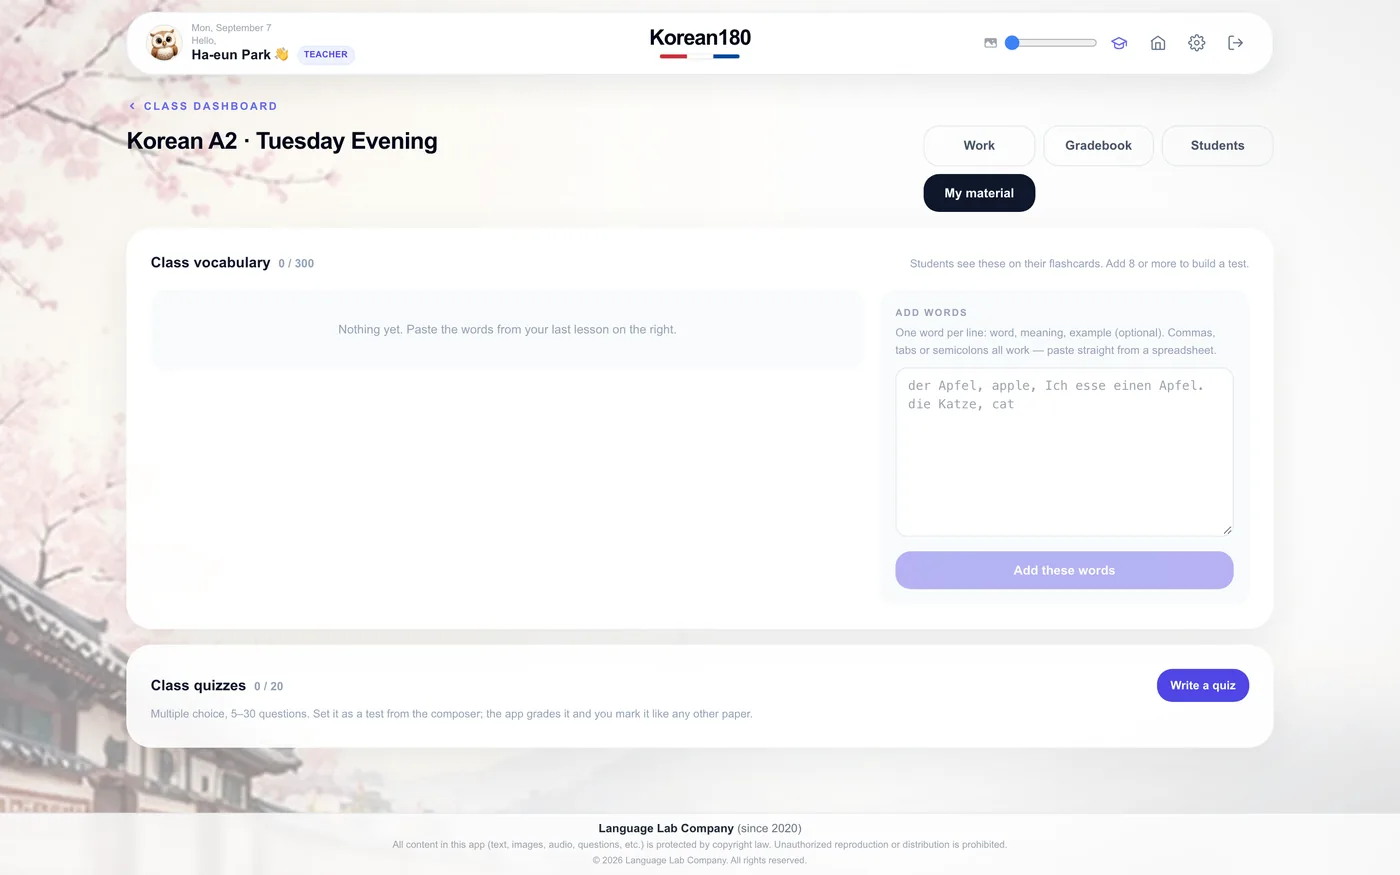
1Open "Materials" on the class page.
2Tap "Add words" and type or paste pairs: the word, its meaning in the students' language.
3Tap "Save". The set appears in "Assign" next to the course sets.
4Assign it like any course set. It enters each student's spaced review the same way.
What you will seeYour set listed under "Materials" with its word count and the classes that use it.
TipPaste two columns from a spreadsheet; the tab between them is read as the separator.
Common mistakeTyping the meaning in the target language makes a monolingual set the review cannot mark.
Chapter 07
Who needs you
Find the students who are stuck before they stop coming.
12
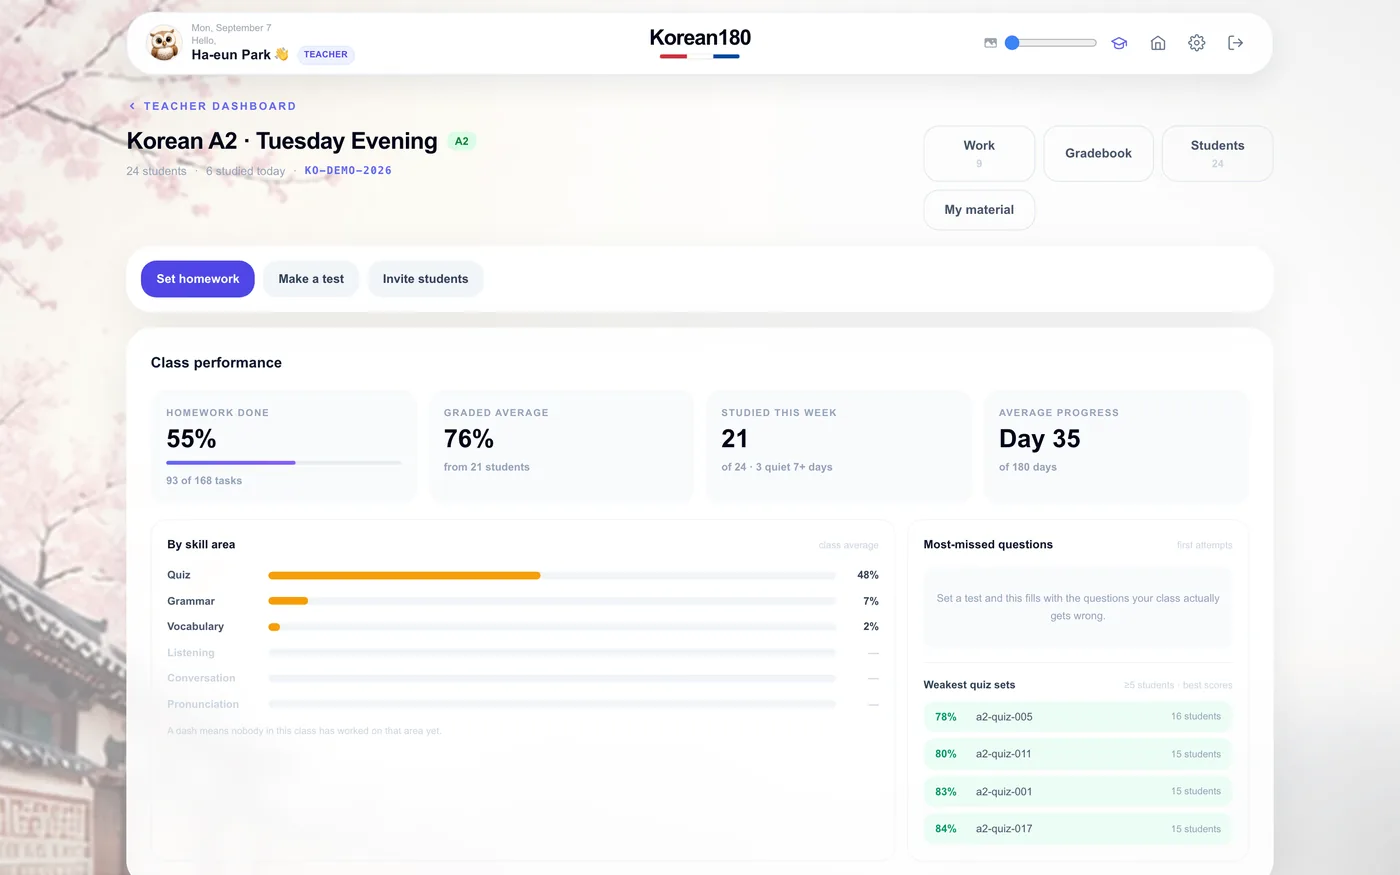
1Open the class. The top strip shows the class day, active students, and average progress.
2Read the "Students" table. Sort by "Last active" to see who has gone quiet.
3Use the filters: "Needs work", "Behind", "On track".
4Open a student from the row to see their history and leave a comment.
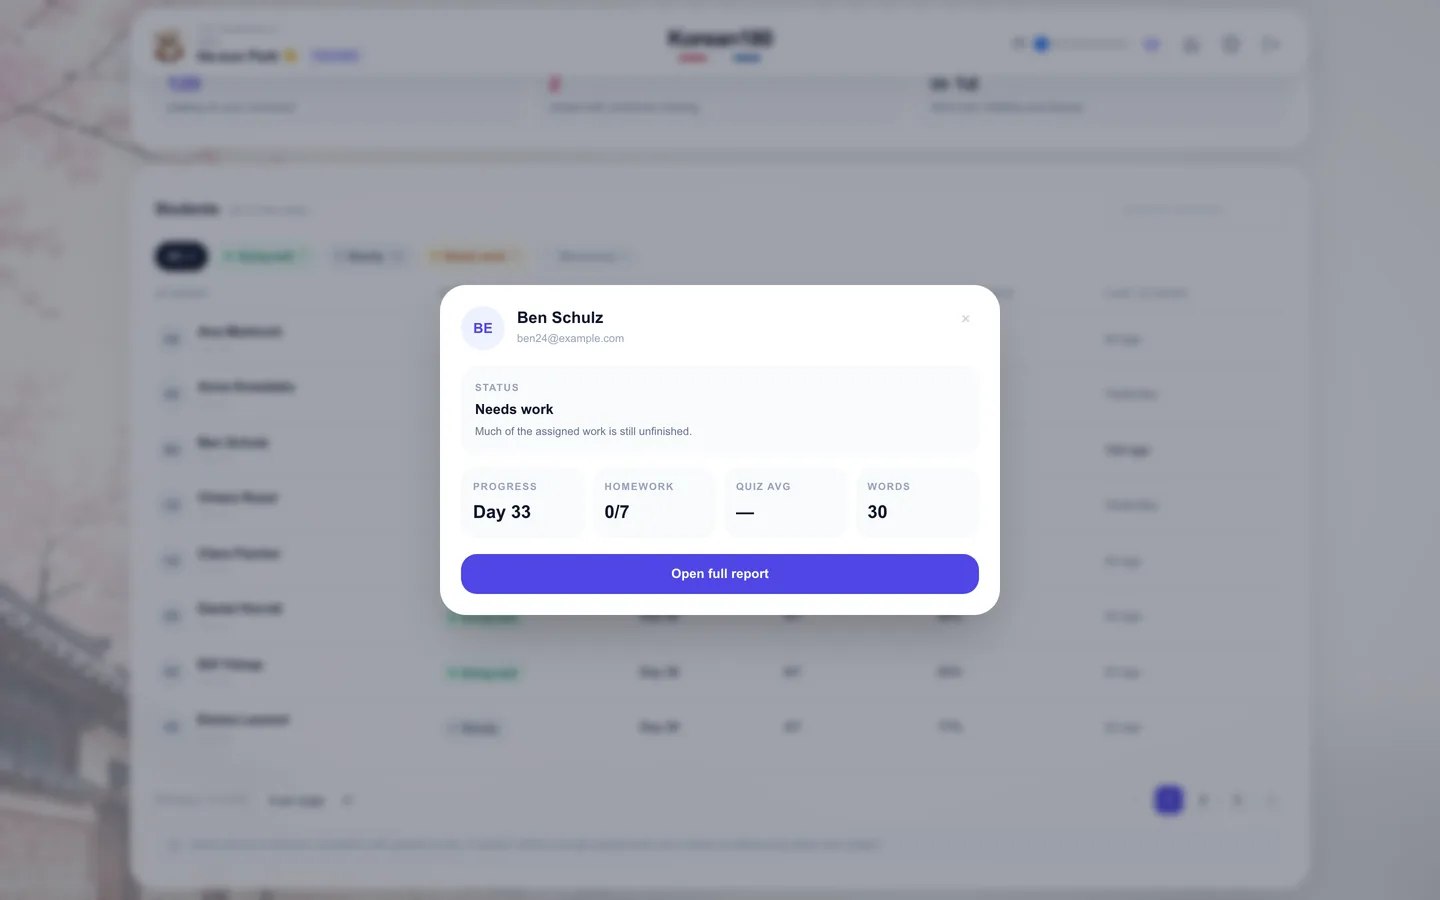
What you will seeOne row per student: day reached, homework done, quiz average, last active, and a status badge.
Tip"Needs you" on the console is this filter across all classes.
Common mistakeReading "Behind" as a grade; it means the student is behind the class day, not that their work is wrong.
Chapter 08
Gradebook
See every result for the class in one grid and export it.
1234
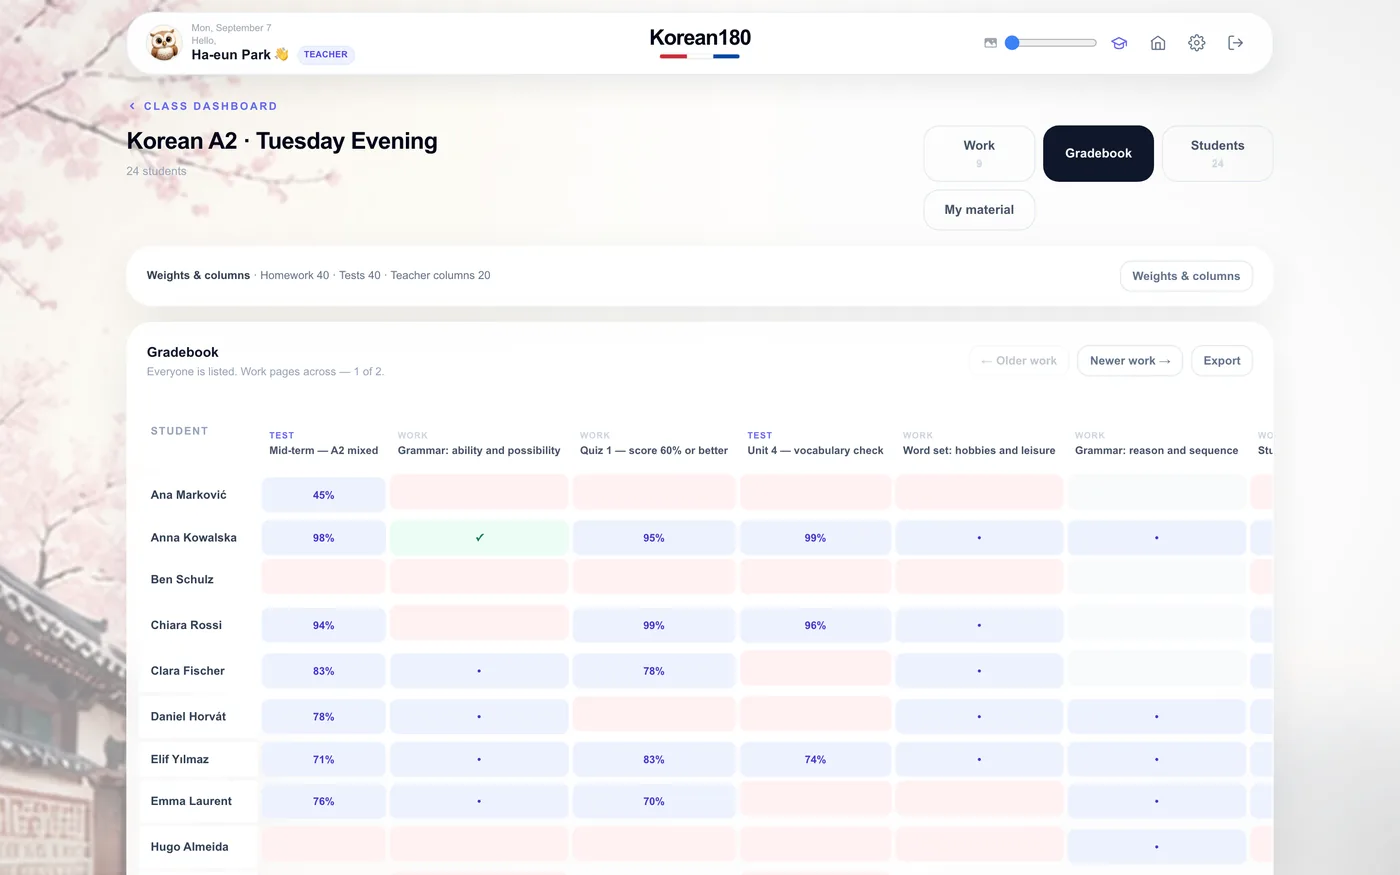
1Open "Gradebook" on the class page. Rows are students, columns are assignments and tests.
2Tap a column header to sort by that result.
3Tap a cell to open the student's answers for that piece of work.
4Tap "Export" for a spreadsheet of the grid.
What you will seePercent per cell, an average per student on the right, and an average per assignment along the foot.
TipA blank cell is work not yet done; a dash is work the student was not assigned.
Common mistakeExporting before the due date exports blanks for students who will still finish on time.
Chapter 09
One student, one comment
Read one student's history and leave the word that keeps them going.
12
1Open a student from any table. The card shows status, day reached, homework done, quiz average, and words learned.
2Tap "Open full report" for the history: every assignment, every test, every wrong answer.
3Open a test and expand a wrong item to see what the student chose and why it was wrong.
4Type a comment in the box and tap "Send". The student sees it on their dashboard and in a mail.
What you will seeThe comment under the result it was written on, and the student removed from "Needs you".
TipOne sentence that names the specific mistake does more than a paragraph of encouragement.
Common mistakeLeaving a mark without a comment; the student sees the mark and no word from you, and that is what "Needs you" counts.
Chapter 10
Seats, plan, and the weekly summary
Know what your seats cost, when the plan renews, and how to hear about the week without logging in.
13
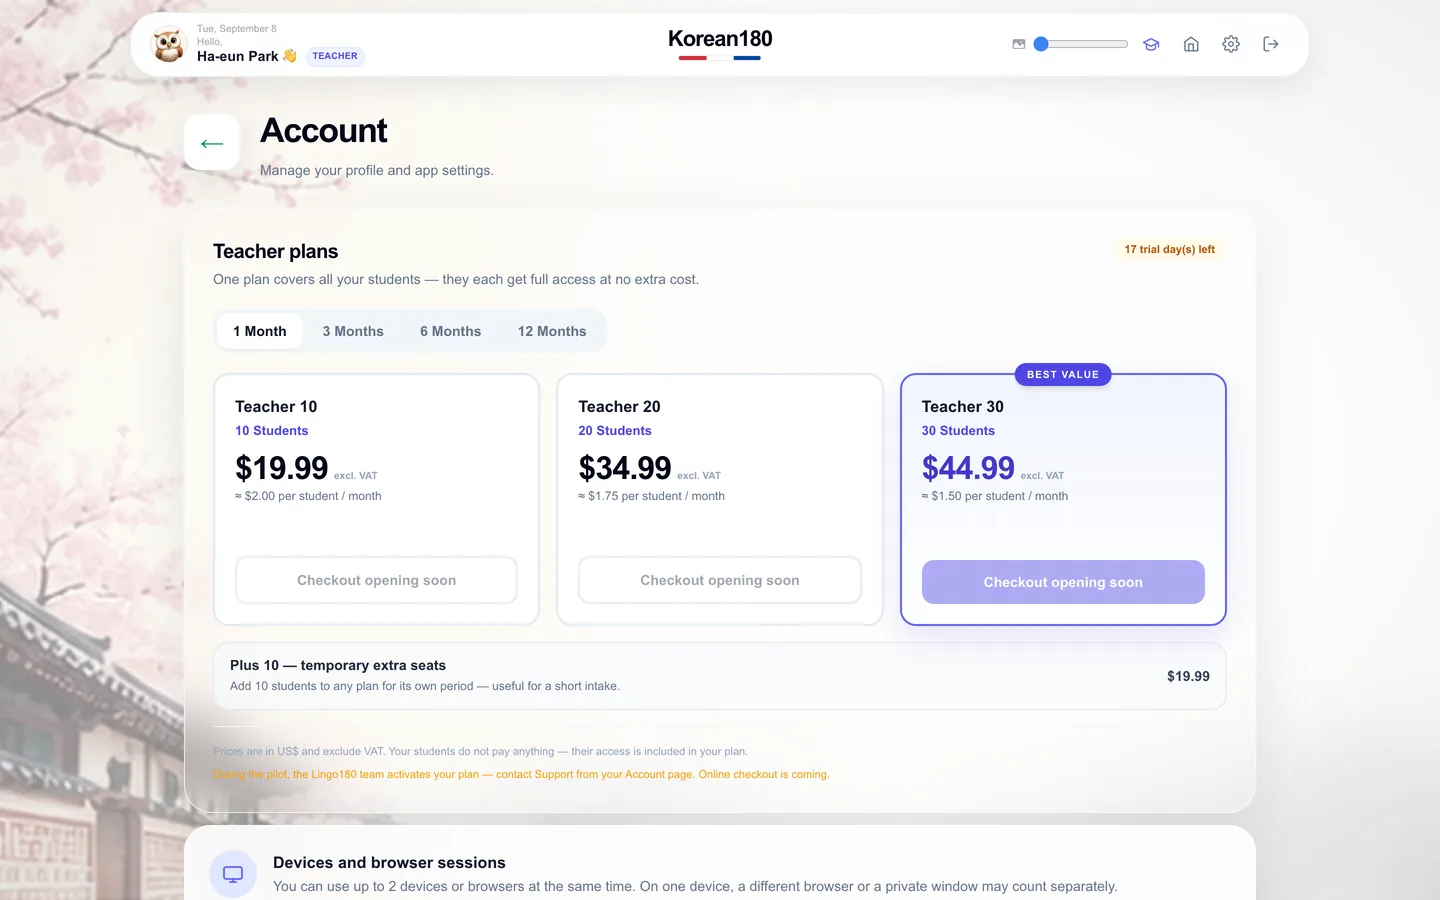
1Open "Account" from the console. "Teacher plans" shows the tiers by period; the one you are on is marked.
2Read the seat counter in the console rail: seats used of seats available, and the renewal date.
3Choose a tier when the trial ends; "Plus 10" adds ten seats to any tier for one period.
4Tick "Weekly summary by email" in the rail. Each Monday, one line per class.
What you will seePrices per period with the per-student figure under each, and the seat bar in the rail filling as students join.
TipEvery seat is billed to you. Students you invite pay nothing and are never asked for a card.
Common mistakeLetting the trial end without choosing a tier keeps the classes but stops new homework; nothing is lost, and nothing is charged.